


Essential Insights On Preparing For The ABFAS Case Review
After recently collecting documents for the American Board of Foot and Ankle Surgery (ABFAS) Case Review, I wanted to offer advice and hints that I found helpful throughout the process. Many of these tips may be common sense while others are a bit more specific and detailed. To that end, this process requires both common sense and attention to detail, using a systematic and organized approach.
These items are for the physician who wants to get a jump on the process from day one in practice. By understanding the rules of the required case review documentation, one can prepare in advance by following the board’s rules from the get-go. The more you can collect ahead of time, the less you have to go back for later. Further, having even just pieces of a patient case gives you a template of items you may need but forget to get/look for when actually performing a case review for that specific patient if that case is chosen for review. Although initially an incomplete case, having the file started early can save you time in the long run when it comes to the official document collection process.
Read the case documentation instructions from ABFAS.1 Collect documents as you go if possible. For each of your surgical patients, make an initial file, which includes the X-ray images, advanced imaging with reports, consults, operation reports, etc. In my personal experience, having these files and images not only helped in the ABFAS case review, but also proved beneficial in creating PowerPoint presentations for educational purposes (academic conferences and community education seminars), or for use in social media posts (following all public record use and HIPAA guidelines for de-identifications).
If a patient comes in with an outside image (i.e., X-ray from an urgent care, MRI, CT, etc.), document the image type, the facility name and location and the date of the study in your progress note. This will make it easier to retrieve the image later if necessary. With any patient, save all surgical images as you go to that file you created.
Read the image submission requirements from ABFAS.1 Make sure you save the imaging you may need for surgical patients either by holding on to CDs from outside facilities or uploading these images to your office’s picture archiving and communication system (PACS) if your PACS system allows. Create a habit of ordering or executing the correct preoperative, initial post-op (within seven days of surgery) and final images incorporating the proper views and weightbearing status. Make sure you save any postoperative images taken while still in the surgical facility, especially if your center uses a mini C-arm that prints the fluoroscopy imaging. Facilities do not often save these to a server and the images can be difficult to find later.
Be critical of your documentation in real time. In my recent experience, I found several instances in which I accidentally logged a case on the ABFAS Podiatry Logging Service for Surgery2 on the wrong date. I also noticed operation reports with dictation errors, blank spots and discrepancies in surgery sidedness. In these situations, pre- and postoperative diagnoses read as the left side, but the surgical description and all pre- and postoperative progress documents indicated the right side. Personally, I dictated an addendum document, explaining the error, which gets uploaded to the hospital electronic medical record (EMR). Print and include this in your case submission.
Many of these errors are items you cannot change down the line. Contact ABFAS to obtain a ruling on any error you wish to flag. Further, save any documentation of this ruling (i.e., email, most likely) and include it in a supplemental letter along with the reason for the error and attempted fixes. Alternately, make sure you document the circumstances or give a written letter of explanation for the reviewer.
Why Being Proactive Pays Off With The Accumulation Of Documentation
Start the process immediately. This is not something to leave until the last few weeks prior to the final submission date. At times, the collection of documents may be out of your control. You may be depending on other people and departments to get what you need. This can take time. By starting right away, both in contacting the facilities from which you need documents and creating an organizational system, you will be on the right track from day one.
Contact locations from where you need files. Ask for documents in the form of pdfs of all records for the patient cases that ABFAS selects. Once you have these documents, you can print and reorganize the documents to comply with the board’s format. If you are requesting a specific document, state this with as much detail as possible (i.e. “MRI of the right foot from January 1”) to help the person collecting the file.
In my recent experience, some locations were able to get me the requested items within one to two weeks while others took four to five weeks based on the breadth of information needed and their associated documentation release policy. I recommend staying on top of the contact at the location weekly to get updates. Without being annoying, respectfully relay the urgency in needing items in a timely fashion.
Best Practices For Staying Organized
Creating an organizational scheme. When collecting your documents, stay organized from the beginning. Figure out a system and stick to it. Create a folder for each patient. Create a labeling system for the documents you have collected. Figure out a way to keep track of the items you have and those that you need.
Create an electronic folder for each patient. I broke up these folders individual. First, I divided them between forefoot and reconstructive rearfoot/ankle procedures for each of the 12 patients selected. Each patient folder included the patient’s name, date of surgery, and facility location. An added caveat for me was denoting the practice location since I changed practices during my case accumulation years.
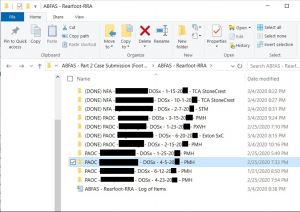
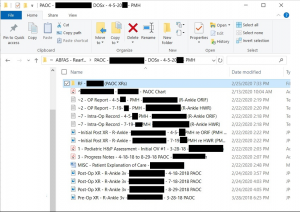
Label everything uniformly. I chose to label each document with its corresponding number per case documentation instructions that ABFAS provides.1 Within the patient folder, figure out a way to note what document is missing. Personally, I created a “text document” (fake document) with my personal labeling system but added a symbol (“~”) to denote a missing item. This way, I grouped my missing items together for easy identification. When I found the item, I would replace the fake document with the real one, removing the symbol from the document title.
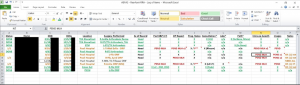
Create a spreadsheet. Make an Excel spread sheet for each of the patients and create columns for each of the required categories of documents. Make comments or notes as to what is missing and update as you collect the documents. Color code items as well. This provides a secondary check to the aforementioned system, collection of all documents. It was also a way that I could add more detail regarding what was missing and where to find it (by using the “add comment” section to an Excel cell).
Contact the board if you have any questions. The board was very quick and helpful in answering any questions I had throughout the process. I typically had an answer within 24 to 48 hours of asking a question and received a clear and directed response to my question. While the process is fairly standard, each submitting physician may have special circumstances or questions when completing his or her case review. Questions will arise so do not feel like you cannot reach out to the board for answers.
A Quick Guide To Proper Image Formatting
Image series formatting. Follow the rules from ABFAS.1 You are only allowed to upload 10 image files per patient. Several of my cases had a lot of images. To reduce the number of files, I put sets of images into one document (i.e. a preoperative X-ray was all three views in one file A MRI file would include one or two images in each of the three planes). This was acceptable per my questioning with the board with the recommendation of making all images appropriately visible to view the specific components of that case.
Keys To Addressing And Avoiding Mistakes
Discrepancies will happen. Discrepancies may include:
- typos with names or dates entered incorrectly;
- a document that just cannot be found;
- a patient lost to follow-up;
- when a doctor changes practices in the middle of a case;
- not being listed as the surgeon of record on hospital documentation; and/or
- double scrubbing a case with a partner who may be of a different specialty (i.e. orthopedics) and is performing a separate procedure, etc.
In these cases, if there is something missing, something needs explanation or there is just something “off” about a case, type a note (document) and submit it in the file as well. Include this in the “Podiatric H & P/Assess” section so it will be one of the initial documents in the patient’s file and seen by the reviewer.
Self-audit. Every week or so when I had a big update to the documents, I would self-audit. To me, this means making sure your system of organization is up to date regarding the files, updating labels, updating the excel sheet, etc. Also make sure the files work. Open each of the files to confirm the JPEG photo or pdf file opens correctly without errors. Occasionally, files may be corrupted or not open correctly.
I had several pdfs that became corrupt and did not work when I transferred them by USB from one computer to another. I also had a few documents that upon uploading, I discovered a file was corrupt and would not upload. In both instances, I had to reprocess (i.e. save, scan, etc.) the document. Do not wait until the last minute. Click or open EVERYTHING to ensure it will upload/open correctly for the review file.
Whenever documents arrive from a center, review them all. Do not assume everything you need is contained within the documents you receive. I had to go back to some places a few times to get the items I needed. This was the result of it either not being in the initial file or when I personally reviewed the case, I discovered another necessary document, which was unknown to me prior to the review.
Prior to the final submission, review everything again. In my experience, I found a few errors or missing pieces on my submission day that I corrected easily before submission.
The process of uploading can be tedious and time-consuming. Expect the process to take two to three hours. The more organized you are, the easier the process. If you are uploading multiple documents in one subsection such as progress notes, the system will merge the documents. Make sure you add these in sequential order. Download the document again after it has been uploaded/merged to confirm that the merged order is correct.
After uploading the documents for each case, I personally recommend downloading each document to ensure they download correctly. If they download okay for you, they should as well for the board.
Understanding The Potential Impact Of Relocation Or Practice Change On Preparing Unique Case Documentation
Doctors new to a practice or facility. Occasionally, when you start at a new practice, you may have another practice (senior) associate double scrub a case that you booked (this is done by practice or hospital protocol) and possibly during that doctor’s “block time.”
Documentation-wise, this can confuse some of the operating room staff who do not know you yet. When you are performing your first few surgical cases, make sure the operating room staff knows who you are and that you are the “surgeon of record” for documentation purposes. For example, my first surgical case with a new practice occurred during the senior physician’s block time and he was just providing a second set of hands. Despite the procedure being booked under my name, all of the operating room records had his name as the “surgeon of record,” likely due to the operating room staff’s familiarity with him and his block time. This unfortunately creates an issue down the line when with the requirement that you be the primary surgeon of record.
In this particular case, the hospital was not able to track down the anesthesiologist or circulating nurse to have them amend the document almost two years later. Therefore, I wrote a supplemental letter explaining the situation, why the name discrepancy existed and had the other doctor cosign the document, attesting to the error and that the case was in fact mine as the primary surgeon of record.
Changing practices. One never knows if or when he or she is going to change practices. Therefore, the more cases you can collect for those first couple of years, the easier it is in the long run. The amount of items to collect really is not that much in my opinion and you can do this with each surgical patient as you go. If you leave a facility/job, be sure to confirm with all sources of potential documents that you will be able to return at a later date to collect items for a board patient case review. Explain the process to them (although they should be familiar with it from those before you). You will not likely have privileges at a facility anymore and this can sometimes make document collection more difficult or drawn out. This includes your practice and all local hospitals and surgery centers where you performed surgery. Collect the name of the person who you will need to contact at each facility so you can get to them directly when the time comes.
It took me a few days right off the start to find the appropriate person or department to contact to get the items I needed. Also, if you did change geographic locations, potentially plan to fly back to that area to personally collect the documents. I contacted my old employer and hospital immediately in January in order to have the documents sent to me as soon as possible to start my review. However, I also set aside one week toward the end of February to fly back in order to collect in person any outstanding items to finalize my cases.
Documentation: Save, Save And Save Again
Save everything. Save all e-mails and correspondence. Save all collected paper documents and imaging CDs until the board posts the results of the case review. Make sure to dispose of them in the correct fashion. As I noted earlier, make sure all documents are finalized and uploaded before you begin to discard documents. Personally, I would keep everything until after the board results later in the spring.
Disclaimer: All of the aforementioned information is my opinion and from my own experience or the experience of others (when noted). If there are any questions, please do not hesitate to contact the ABFAS for specific questions pertaining to your situation. Neither Podiatry Today nor I hold any responsibility for errors made in a reader’s case submission. Each submitter’s situation in specific and individualized when it comes to the ABFAS case review.
Dr. Hood is a fellowship-trained foot and ankle surgeon. Follow him on Twitter and Instagram at @crhoodjrdpm or visit his website www.footankleresource.com, which contains information on student/resident/new practitioner transitioning, and links to academic and educational resources found throughout the Internet related to foot and ankle medicine. He also offers both resume/cover letter and employment agreement (contract) review for podiatric residents and physicians.
Dr. Hood gives special thanks to Michael L. Sganga, DPM, who assisted with this blog. Dr. Sganga is in private practice at Orthopedics New England in Natick, MA. He was recently board-certified by the ABFAS in foot and rearfoot/reconstructive ankle surgery.
References
- American Board of Foot and Ankle Surgery. Information and requirements for board certification. Available at: https://www.abfas.org/docs/default-source/abfas-documents/bcdoc2019.pdf?sfvrsn=bd0d35f1_6 . Published October 2019. Accessed March 19, 2020.
- American Board of Foot and Ankle Surgery. Podiatry logging service for surgery. Available at: https://www.podiatricsurgery.net . Accessed March 19, 2020.
Related Reading
https://www.podiatrytoday.com/blogged/vital-steps-preparing-abfas-case-review-submission
· https://www.podiatrytoday.com/blogged/how-prepare-upcoming-abfas-exam
· https://www.podiatrytoday.com/blogged/closer-look-costs-passing-boards-podiatry

